Rides Scooter

This artwork dedicated to my childhood friend.
He asked me to draw him self rides scooter.


Rigging Reel 2015 on Autodesk Maya

An animation rig build on Autodesk Maya 2013.5
All feature attributes described on the video, like as FK/ IK switchable, stretch squash on arms and legs, facial control and etc. Hope you like it!
Enclosed below the grab pictures of
wireframe model, joints/ bones, controllers and captured video:
 |
| wire and controllers |

Wisnu Wijaya © 2015. All Rights Reserved.
The Ancient Borobudur

Most suggests that Borobudur was built on the edge or even in the middle of the ancient lake. But, the existence of this ancient lake still be a matter of heated debate among archaeologists in the 20th century.
At least, I just wanna redefine my visual perception about the ancient of Borobudur based on the literature I've read, and it's worth to show to people in visual media. Well, this project's certainly just for fun. A personal project. All was made in After Effect, touch up the photograph with Photoshop, and lil'bit project image to 3D proxy model in Cinema 4D.
Discover and enrich your experiences more about Borobudur on Wikipedia and of course visit it! Yes! Come to Indonesia to see by yourself Borobudur, stone monuments and hundred of wonderful places. Leave your adventure traces there!
[FYI: Borobudur is located at Magelang, Central Java, Java island, west of Bali island.
Both of them are located in the territory of Indonesia.]


WIP#2 Rendering of HDH S-5

This is final render of my last 3D vehicle project on 2014. I brought it all of the mesh to Cinema 4D and render out there. And.. aah yup, you chould check it out my last post about the process from scratch over here: THE PROCESS LINK


I'll update for this video version, ASAP. Thanks.
Limbad The Medusa 2014

Limbad The Medusa - Motion Graphic Package 2014
This is a part of 'Limbad The Medusa' show.
A Motion graphic package for a magician show, Limbad, held in Jakarta -
Indonesia at August
2014 during 25th anniversary of RCTI.
Produced at RCTI ©
2014
Concept, Design, Motion, Direction | Wisnu Wijaya (Inu Seagy)
Logo Redesign, Pre-Concept | Wisnu Wijaya (Inu Seagy)
Sound Design | Vishnu Satya Graha
Artist talent | Limbad
Concept, Design, Motion, Direction | Wisnu Wijaya (Inu Seagy)
Logo Redesign, Pre-Concept | Wisnu Wijaya (Inu Seagy)
Sound Design | Vishnu Satya Graha
Artist talent | Limbad

Motion Graphic Reel 2013

Today is the end of 2013 and that's mean the perfect time to publish my works arange 2012-2013.
Kwik vs Jet (Fan art)

"Kwik" is a mascot of celullar provider in Indonesia.
I like those design and decide to make an experiment short clip about him. Check it out!


Coboy Junior Concert - 1st Anniversary
(Coboy Junior performance on their 1st Anniversary Concert)

Those's one of my job on the last July 2012, opening bumper (also all graphic and lower third related to this program) for "Konser B'Day Coboy Junior" - 1st Anniversary. Besides produce the OBB -Opening Before Broadcast-, we (me and my friend, Adeta Eryantara ) also hold VJing the screen -LED behind the main stage- thanks friend! What the great VJing! Wohoooo! :)
 |
| Screenshots of the opening "Konser B'day Coboy Junior" |
---------------------------------------------
Behind The Scene
On the video above, I wanna point out the main "twist and bend" effect which can show "kiddy" impression. In animation, we knew "stretch and squash", one the important of 12 principle of animation. Squash and Stretch was described in The Illusion of Life as being "by far the most important" discovery that the Disney animators made in their pursuit of excellence in animation (Thomas & Johnston, p.47). In this OBB, this principle reached technically with modifier "Twist" and "Bend".
 |
| (source: www.toonboom.com) All was made in Autodesk 3ds Max and Adobe After Effect. Here's some the wire view:  |
...and the last, rendering and compositing. There's no special treatment, only simple setting on both 3d software and After Effect, even I don't using ZDepth as usually.

Tutorial: IK FK Blending Arm Rig
This is about the making of "IK FK" blending rig on the arm character.


Prepare some layers for bones (bone FK, IK and normal bone which be skined - we call this as 'skin bone'). This layer grouping can help us later in making 'orientation constraint' to 'skin bone'.

Just build arm bone! (Make sure to make the joint between 2 arm is crooked little bit.)
Copy the Skin_Bone into 'FK_Bone' (Blue) and 'IK_Bone' (Red).
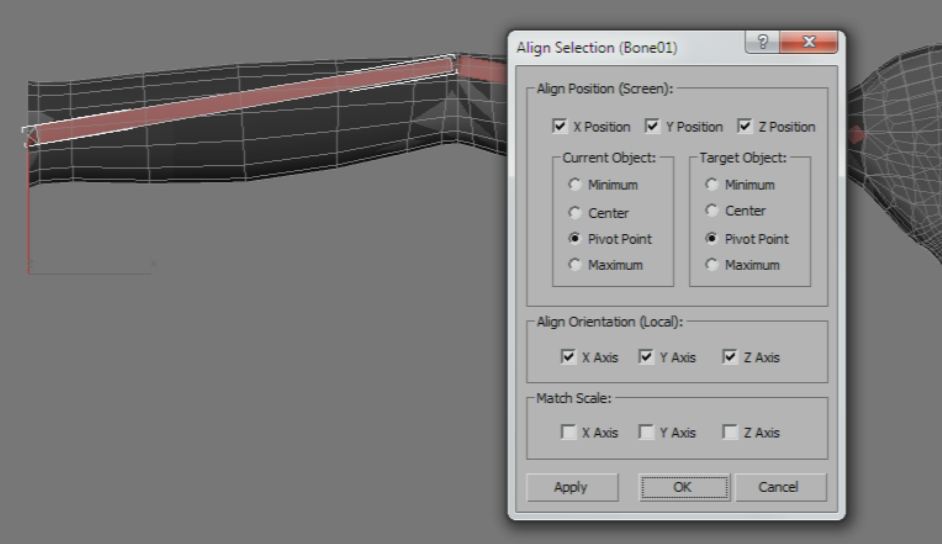
Align it to 'Skin_Bone'.

First, we are now focus on the FK Bone. Make 3 controls (cylinder spline) and link it according the image.


And now we are on IK Bone, also make 3 controls (cylinder spline) and link it according the image.

Particularly for Bone IK, we give a HI Solver from bone IK 01 to bone IK null

Try to move the IK!

Pick target IK Solver to IK Control 02.

Make control to bone_skin.

Before we go to 'orientation constraint' process, we skin our arm mesh to 'bone_skin'.


Select 'bone_skin 01' and orient (constraint) it to 'FK_bone 01' and 'IK_bone 01'.
Select 'bone_skin 02' and orient (constraint) it to 'FK_bone 02' and 'IK_bone 02'.
Select 'bone_skin null' and orient (constraint) it to 'FK_bone null' and 'IK_bone null'.

Select hand control and add attribute holder on it. Please watch the making of attribte holder using Max Script on other video (on the end of this tutorial)!

and last, press 'Alt+5' (wire parameter) to connect all of the controls with 'orient constraint',
so the 'IK FK switcher' can be work. For details, just see the video!
(Note: when you connect the 'IKFKpara' to 'Orientation Weight 1', the script is:
"100-IKFKpara*10")
-------------------------------------------------------------------------
Video below is about writing a script to make the attribute holder support "IK FK" switching.
This is related to the video above, so you'd better hang of it.
This is a simple script to help you for switching IK to FK and otherwise. After you write it all in MaxScript (MaxScript, MaxScript Editor), pick an object (control) on viewport, back to this MaxScript and press 'Ctrl + E' (tools, evaluate all).

(open in new tab to bigger size)
Thanks for reading :) Hope it usefull.