Coboy Junior Concert - 1st Anniversary
(Coboy Junior performance on their 1st Anniversary Concert)

Those's one of my job on the last July 2012, opening bumper (also all graphic and lower third related to this program) for "Konser B'Day Coboy Junior" - 1st Anniversary. Besides produce the OBB -Opening Before Broadcast-, we (me and my friend, Adeta Eryantara ) also hold VJing the screen -LED behind the main stage- thanks friend! What the great VJing! Wohoooo! :)
 |
| Screenshots of the opening "Konser B'day Coboy Junior" |
---------------------------------------------
Behind The Scene
On the video above, I wanna point out the main "twist and bend" effect which can show "kiddy" impression. In animation, we knew "stretch and squash", one the important of 12 principle of animation. Squash and Stretch was described in The Illusion of Life as being "by far the most important" discovery that the Disney animators made in their pursuit of excellence in animation (Thomas & Johnston, p.47). In this OBB, this principle reached technically with modifier "Twist" and "Bend".
 |
| (source: www.toonboom.com) All was made in Autodesk 3ds Max and Adobe After Effect. Here's some the wire view:  |
...and the last, rendering and compositing. There's no special treatment, only simple setting on both 3d software and After Effect, even I don't using ZDepth as usually.

Tutorial: IK FK Blending Arm Rig
This is about the making of "IK FK" blending rig on the arm character.


Prepare some layers for bones (bone FK, IK and normal bone which be skined - we call this as 'skin bone'). This layer grouping can help us later in making 'orientation constraint' to 'skin bone'.

Just build arm bone! (Make sure to make the joint between 2 arm is crooked little bit.)
Copy the Skin_Bone into 'FK_Bone' (Blue) and 'IK_Bone' (Red).
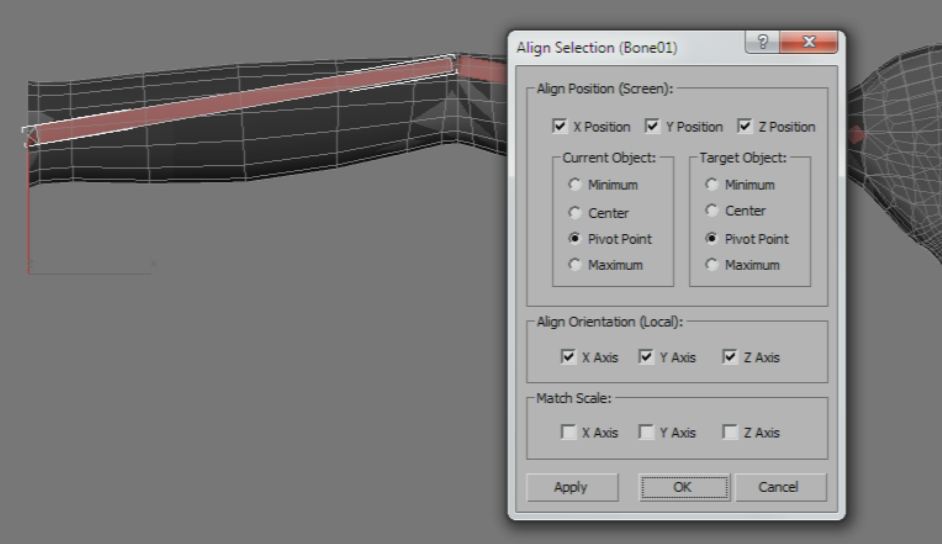
Align it to 'Skin_Bone'.

First, we are now focus on the FK Bone. Make 3 controls (cylinder spline) and link it according the image.


And now we are on IK Bone, also make 3 controls (cylinder spline) and link it according the image.

Particularly for Bone IK, we give a HI Solver from bone IK 01 to bone IK null

Try to move the IK!

Pick target IK Solver to IK Control 02.

Make control to bone_skin.

Before we go to 'orientation constraint' process, we skin our arm mesh to 'bone_skin'.


Select 'bone_skin 01' and orient (constraint) it to 'FK_bone 01' and 'IK_bone 01'.
Select 'bone_skin 02' and orient (constraint) it to 'FK_bone 02' and 'IK_bone 02'.
Select 'bone_skin null' and orient (constraint) it to 'FK_bone null' and 'IK_bone null'.

Select hand control and add attribute holder on it. Please watch the making of attribte holder using Max Script on other video (on the end of this tutorial)!

and last, press 'Alt+5' (wire parameter) to connect all of the controls with 'orient constraint',
so the 'IK FK switcher' can be work. For details, just see the video!
(Note: when you connect the 'IKFKpara' to 'Orientation Weight 1', the script is:
"100-IKFKpara*10")
-------------------------------------------------------------------------
Video below is about writing a script to make the attribute holder support "IK FK" switching.
This is related to the video above, so you'd better hang of it.
This is a simple script to help you for switching IK to FK and otherwise. After you write it all in MaxScript (MaxScript, MaxScript Editor), pick an object (control) on viewport, back to this MaxScript and press 'Ctrl + E' (tools, evaluate all).

(open in new tab to bigger size)
Thanks for reading :) Hope it usefull.
Super Dahsyat Concert Opening

Bumper for opening music concert "Super Dahsyat". It was held in RCTI TV, May 2012.
All was done within 1.5 hours (my first extreme thigh deadline). 3D Objects modeled in 3dsmax and composite in After Effects and here's the final work:
and here's the breakdown behind it:
Here's I describe the making of this mograph in essence:
Model & Controller
In the most of animation projects, I prefer use lowpoly model than high poly (of course!) even in a non-character animation. The reason is, the capability to accelerate your current work in animation stage process.
After modeling phase is done, make sure give them the appropriate name which should be categorized by 'mesh, helper, spline, or bone'. It's all can help you later in the next processes, such as importing, selecting, skining and other's stage.
Then, make sure to link/ parent the mesh selected to the helper or controller. In other words, we currently animate that helper or controller, not the mesh. It is to avoid the unexpected deformation.
Then, make sure to link/ parent the mesh selected to the helper or controller. In other words, we currently animate that helper or controller, not the mesh. It is to avoid the unexpected deformation.
There's a variety way on modeling in 3dsmax, such as by make polygon, combination of spline and shape, lofting, etc.. it's up to you. But, make sure to collapse all the modifier (such as symmetry, bend, ) to be one list object (editable poly). I suggest you this way in order to access that mesh lighter .
----------------------------------------------------------

The objects seem like loudspeaker arranged with some box mesh deformation which linked to the helper.
I just move one stick, then copy them using "Array" and make sure makes different time in animating each other to get dynamic impression. Unfortunately, in 3dsmax we'll take a minute to do that, we've to actually copy the mesh. In contrast to Cinema 4D which provide the effector called "Cloner".

The objects seem like loudspeaker arranged with some box mesh deformation which linked to the helper.
I just move one stick, then copy them using "Array" and make sure makes different time in animating each other to get dynamic impression. Unfortunately, in 3dsmax we'll take a minute to do that, we've to actually copy the mesh. In contrast to Cinema 4D which provide the effector called "Cloner".
----------------------------------------------------------


The object "Twist cables" are made using a combination of mesh extruded and modifiers. The first modifier is "Extrude" it self, a closed spline was. Then we twist the mesh using modifier "Twist" and last we crooked it with "Bend". Simple way, is it not!


----------------------------------------------------------
Rendering & Compositing
In this case, i use V-Ray rendering engine. The setting is, GI (Global Ilumination) and reflection active of course. I choose to accelerate rendering in low profile mode, the consequence is the declining quality. In element of rendering, add zdepth, reflection and color of flat wire. Zdepth used to add more accurately amount of blur. In the after effects CS5, we use this zdepth in the filter option 'Lensblur'.

While the reflection becomes an additional option to refine the object of reflection, you can change the mode of layer to get appropriate results. Finally, the color of flat wire is used to facilitate selection when adding a certain effect. This combination of render element will make a beautiful composition. Thank's.
Cinematic of Dewaruci (Undergraduate Project)

My project for undergraduate program. Overall, it's all about the stories of wayang, simply visualize into 3D animation & game. Anyway, indeed this is not my best work, there's a lack of animation and visual, but at the time, I proud of it I did.
Technically all the production processes was done in 2 months. I do all the processes from scratch, model the characters and props, rig, animate and render the scenes on 3DS Max. Brought it all to After Effect to compose and final score.


Here's some clip of the project
and this one's making of the project:

Poster

DVD Cover
WIP#1 Modelling of HDH S-5 (vehicle)
 |
| sketch reference of HDH S-5 Actually, this my sketch reference contained some of vehicle in "Freedom" (OVA, animated series) who's commissioned with and designed by Katsuhiro Otomo.. yeeaah, i'm inspired totally by Otomo's vehicle design, his manga also. And recently, I model 3d vehicle based on my own mind after collect the reference. Sometimes, I leave my early sketch and just modeling on my enthusiasm although keep on my beginning concept. ..and here's the progress of HDH S-5 (3d model only):   ..well, be ready steady to rigging phase, mapping, texturing and searching render setting... the journey must go on.. Thanks for viewing :) |
a 3d Car(toon): Minisea Super Taxi
Dum dum dum, here's a car with a cartoon style, I designed it after watching a short film Salesmen Pete... Well, I built the 3d model as well as rigging up, all done in 3ds max. In the process of texturing, I used a different method than before, heey I do it directly on 3d objects using Photoshop CS 5 (well, maybe I was too late to do it ..)
 |
| Minisea Super Taxi - with controller (spline controller) |
Here, I show you the process of texturing in brief and simple video. Ooh yeaah, I don't forget to insert the workings of the controller at the end of the video .. :)
Actually, technically in the way of rigging is quite simple, just use 'wire parameters' for the interaction of rotation on some objects, such as door, glass cleaner etc. While flexibility impression all of the car body part is made by FFD Box.

The process for FFD Box is, choose some point on the FFD Box then controlled by the modifier 'Link XForms', does towards a spline controller which supposed to used.
These few tips on texturing:

First think first, make sure that the 3d model has been unwrapped, you may also save the layout of the wire rendering (uv template) to assist in the painting later. Then export the selected object in "Obj". ...well done, switch to Photoshop (CS 5).
 |
| Sometimes we may give it material 'checker board' for checking whether the uv mapping correct. |

And last, here's wire of the model in low poly (18,000 poly)
and high poly (220,000 poly in subdivision 2).

Well, that's all for today, thanks for viewing :)
Jalan Jalan
It’s about a last month ago, exactly in July 30, 2011, We (I and my friends from Kasatmata's studio) fill one session hands down on event of animation, Jogjanimation, in ‘Taman Budaya’ (Yogyakarta, Indonesia) which initially by Mr.Yudho since about 1 year ago (Jogjanimation held one a month)... Just go to Jogjanimation Site or The Page on Facebook to know more about it..

Well, Gangsar Waskito (Director), Rimbar diorisma (Manager) and Muhammad Ihlas (Art Director) filling conference about pipeline of animation production in Kasatmata's studio, then is drawned out about “ Hiro Hiro”. Actually, it’s wide project, inquiring what Hiro-Hiro is? I recommend go to Hiro-hiro on Facebook and Hiro-hiro blog for clear.
 Kasatmata team in 2011, Actually it's all 17 person now. (I always wear long sleeve shirt, so easy to recognized) | ||||
They’re my friends from some division: technical, visual, animation and lighting. Aaakkhh, don't believe this serious pose.. they are not as calm as this, trust me! It’s all supposed innocent poses, aren’t they!?! hahaha.. Psst! Come closer i’ll show you their real activity in studio..
|


Tag :
Activities